The previous post explained how to install the OpenElec XBMC-Kodi on a Raspberry Pi. This post explains the simplest way to enable plug-ins in XBMC. Plug-ins are also called add-ons.
Note: you do not have to have Kodi running on the Raspberry Pi. You could be using an Android device or a Windows PC.
The next posts will focus on the most popular XBMC plug-ins for UK TV. These are:
- the iPlayer plug-ins such as BBC iPlayer
- TVCatchup
- Filmon


Filmon UK TV channels and TVCatchup Program Guide
There are two stages to setting up a plug-in, first installing and then enabling.
XBMC-Kodi comes with a number of video plug-ins already installed but not enabled and so you can practise with one of those. Perhaps the most useful pre-installed video plug-in is YouTube, if you are interested in watching YouTube on your TV. Another pre-installed plug-in is South Park, which provides access to 17 seasons of broadcasts – about 200 episodes. There are a few news channels, such as Al Jazeera.
After practising in Part 1, Part 2 will explain how to do a full UK TV add-on installation, starting with BBC iPlayer. The iPlayer plug-in provides live TV and catch-up TV in high definition.
These instructions apply to any XBMC version, including Windows, Linux and Android. Use a recently updated version of XBMC if possible. If you use a Raspberry Pi then you most likely have the OpenElec or the RaspbMC version of XBMC-Kodi.
If you are running XBMC on the same PC used to read these instructions, you will want to switch between these instructions and the XBMC screen. From XBMC running in Windows you use Alt + Tab (while holding down the Alt key, press and release the Tab key). That gets you back to the Windows screen and leaves XBMC running. Then, to return to XBMC, use Alt + Tab again, or click the XBMC icon on the task bar.
Enable an Add-on
As an example of how to enable an add-on, we shall use the South Park Episodes video add-on. The same method applies to the YouTube add-on. There are a lot of pre-installed add-ons, most of which I’d never use. One reason for choosing South Park is that you can practise changing an add-on’s settings (using the Settings box). The South Park settings include a language option which could be set to English. You could try to change the default language from English to German. The BBC iPlayer settings box has many settings and so it is worth taking a little time to practise. iPlayer includes settings to change the video stream quality (four settings from low to high definition), to add a proxy server and to switch subtitles on/off.
Before looking at the detail, including the screen shots below, the list 1 to 4 summarises the mouse clicks.
You start from the Videos menu on the main menu BUT do not click Videos. Point the mouse at Videos and the Add-ons sub-menu appears below it (item 1 in the list). Click on each item starting with item 1. Add-ons, as follows:
Videos → 1. Add-ons→ 2. Get More→ 3. SouthPark.de→ 4. Install
If you are using a remote control and not a mouse, use the left-right and up-down navigation buttons and press OK (Enter) to select a menu item.
Using a mouse:
Point at (do not click) Videos on the main XBMC menu – Videos is then highlighted.
You can see the Files and Add-ons menus underneath the main menu.
Carefully move the mouse down to point at Add-ons – Add-ons is then highlighted.

-
XBMC Showing the Video Add-ons Menu Highlighted

1. click Add-ons.
The Videos – Add-ons menu is shown.

-
The Videos – Add-ons Menu Shows Three Enabled Video Add-ons

2. click Get More.
It is possible that the Add-ons – Get Add-ons menu will display, shown below, especially if this is the first time you have enabled an add-on. If it does not display you’ll get the Add-ons – Video Add-ons menu instead.

-
The Add-ons – Get Add-ons Menu with the XBMC Add-ons Highlighted

If the screen above does show, click XBMC.org Add-ons. You will then get the Add-ons – XBMC.org Add-ons menu. Then click Video Add-ons. That’s the end of the small detour.
If the above screen did not show, continue from here.
The Add-ons – Video Add-ons menu is then shown. It is a long list of all the pre-installed video add-ons.

-
The Video Add-ons List Showing South Park

The image above shows the South Park add-on highlighted on the list of available add-ons.
Scroll down to South Park – note that in these screen shots it is called SouthPark.de
3. click South Park
An Add-on Information box is shown with Install highlighted.

-
The Add-on Information Box for South Park

The Add-on Information box contains all the settings for the add-on. When you click Install the information box will close. The most recent add-on script will be downloaded and so you need an internet connection.
Then a % download counter will appear next to South Park in the Add-ons list. You may also see a ‘working’ message at the bottom of the screen.
4. click Install to enable South Park.

-
When You Click Install the Download Starts

Wait for the enabled message alongside South Park on the left side of the screen.

-
South Park is Now Enabled

If you prefer you can enable the YouTube add-on the same way.
Navigation in XBMC
Before using the South Park add-on to view an episode, a few notes on using XBMC-Kodi.
The bottom right hand of the screen shows two icons:
The left pointing arrow is the back button. The house symbol is the home button.
To get back to the main menu now, click the home button.
In XBMC, a right-click on an empty part of the screen acts as the back button. If you need to go back a stage, do a right-click or click the back button.
If you use a remote try the back button on that. It may be a left pointing arrow. It may be labelled Return. The backspace on a keyboard also works.
Some XBMC menus appear in a box with a cross × at the top right-hand corner. Click × to close the box.
To close XBMC you can use the standby icon at the bottom of the home screen, left side. The options depend on your version of XBMC. You can Power Off and Reboot. There may be an Exit option – useful if you are running XBMC under a Windows or Apple Mac operating system. Use Exit to close the XBMC application without shutting down the PC.
If XBMC is running under Windows, use Alt + Tab (while holding down the Alt key, press and release the Tab key). That gets you back to the Windows screen and leaves XBMC running.
View a Video
To play a video add-on you start from the Videos menu on the main menu – similar to when you enabled an add-on.
If you enabled South Park then, to play the Hobbit episode, the click sequence is:
Videos → 1. Add-ons→ 2. South Park→ 3. Season 17→ 4. Hobbit
Detailed instructions:
Point at the Videos menu item – do not click.
1. click Add-ons.
Notice that South Park is now listed.

-
South Park is Now Listed in Videos – Add-ons

2. click South Park
The Settings box may be displayed – click OK
3. scroll down to Season 17 and click.
The episodes for Season 17 are listed.

-
The Videos – South Park List

4. click the last episode to play The Hobbit.
The episode should play. Watch out for messages at the bottom right of screen. You may see a message about geo-blocking. Depending on which country you are in the stream could be blocked and fail to play. If after a few attempts the stream refuses to play then try changing the default country from US. See the next section: Settings Menu.
To stop the stream using a mouse:
1. move the mouse.
2. the player buttons appear at the bottom of the screen.
3. click the stop button.
The video will stop and you are returned to the previous screen, the list of episodes.
The Settings Menu
This is a good point to practise the XBMC Settings menu. You can use Settings to change the properties of the UK TV video streams, in particular, the quality of the stream in iPlayer and TVCatchup and to switch on and off subtitles in iPlayer catch up.
The default language for the current South Park add-on is English and the country is US. Use the add-ons Settings menu to switch to another language, such as German. Remember – this is just an exercise to get used to Kodi.
If you enabled YouTube instead of South Park, follow the same instructions but practise by changing the video quality setting in YouTube.
Each add-on has a settings menu, also called Add-on Information. The settings are accessed through the System menu on the XBMC main menu.
Start from the System menu. The click sequence is:
System → 1. Settings→ 2. Add-ons→ 3. Enabled Add-ons→ 4. Video Add-ons→ 5. South Park /YouTube→ 6. Configure
Before continuing with the click sequence, if you think that’s a lot of clicks in the sequence then you are right. There is an alternative way to reach the Add-on Information that avoids the six clicks of the System menu route. However, if you are new to XBMC-Kodi you are recommended to follow the six-click sequence just to get practice with the system menu.
There is a note about the shortcut alternative at the end of this post.
The screens below show the six-click detail.
Go to the main menu. The easiest way is to click the Home icon.
1. point at the System menu and then click the Settings menu.

-
The System Settings Menu Highlighted

When you click Settings the Change Your Settings box opens. You will change an add-on setting.

-
The Change Your Settings Box with Add-ons Highlighted

2. click Add-ons to change an add-on’s settings.
The Add-ons menu opens.

-
The Add-ons Menu with Enabled Add-ons Highlighted

3. click Enabled Add-ons.
The Add-ons – Enabled Add-ons menu opens.

-
The Enabled Add-ons Menu with Video Add-ons Highlighted

South Park and YouTube are video add-ons.
4. click Video Add-ons.
The Add-ons – Video Add-ons menu opens.

-
The Video Add-ons Menu with South Park Highlighted

5. click SouthPark or YouTube (whichever you enabled).
The South Park Add-ons Information box opens.

-
The South Park Information Box with Configure Highlighted

6. click Configure.
The South Park Settings box opens.
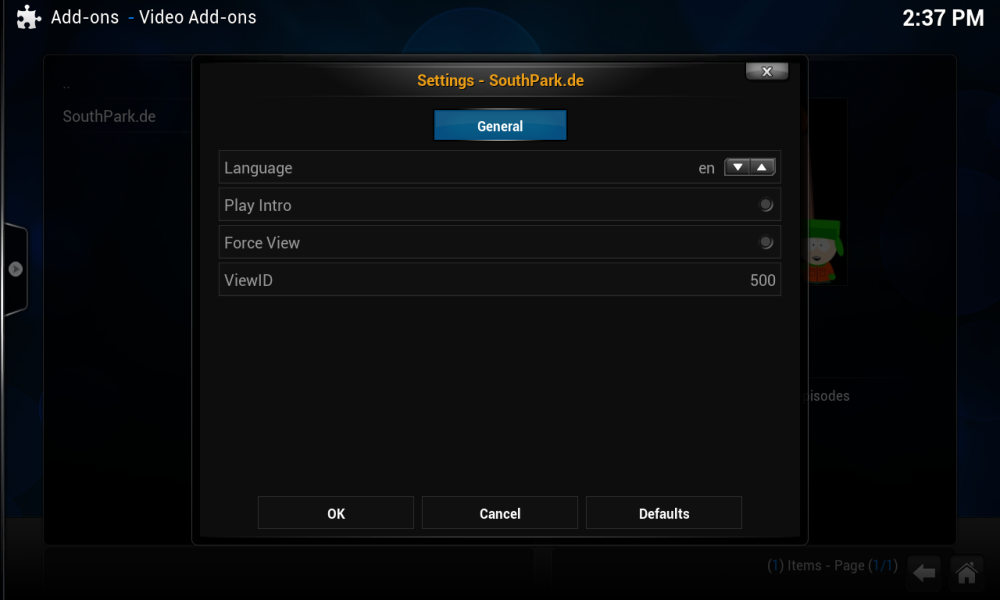
The Add-ons Information Box with the Language Set to ‘en’ for English
Click the up or down arrow alongside en to change to de.
7. click OK to save the setting.
8. close the Add-on Information box.
Well done if you got through all that.
Now click the Home button to return to the main menu. Play a South Park episode and check that the language did change. You may wish to leave South Park playing for a while and we’ll take a look at that shortcut to an add-ons Settings box. If you wish to, stop the video but leave the Videos – South Park list of episodes on the screen.
Shortcut to a Video Add-on Settings Box
A shortcut is preferable if you are already playing a video, example South Park, and want to change a setting. It may be possible to do this while the video is still playing but in this example stop the play and return to the Videos – South Park list.
Once you are back on the Videos – South Park list, right-click on any of the episodes. If you are using a remote control then you’ll need one with a built in mouse pad for a right-click. An options menu pops up. Click the Add-on settings option. The settings menu is shown and you have bypassed the six clicks from the Settings menu click sequence.
The next posts will show how to install the BBC iPlayer and Filmon add-ons.

Leave a comment